Performing the Linksys Velop setup to ensure lag-free network connectivity
In this modern world, getting a reliable and strong wifi connection in your home can be challenging. Additionally, Linksys made it easier by launching its latest wifi routers and velop mesh wifi systems. However, to harness the full potential of these devices, first you need to perform the linksys velop setup process.
Therefore, this guide is specifically designed to provide you with deeper insights on the linksys velop router setup process. In addition, this page highlights the Velop setup process in a detailed manner, followed by effective troubleshooting tips. So, to get the full details, stay on this page!
What do we need to have for Linksys Velop Setup?
When you begin with the Velop setup process, you need to first have some basic things with you, as listed below:

A stable internet connection

Accurate web/IP address

Valid administrative credentials

Linksys app

Computer/laptop /smartphone

Ethernet Cables
Setting up the Linksys Velop Mesh WiFi differently
Generally, the Linksys velop mesh wifi setup process can be carried out in two ways, either through the Linksys app or the web GUI. So, if you don’t know how to setup a Linksys Velop mesh wifi system, then worry not. In this section, we provide you information on the different ways to setup Linksys Velop, as defined below:
Using the Web GUI to setup Linksys Velop mesh wifi
- To begin with, power on your Linksys parent node and wait for a purplish blink on it.
- Then, connect your computer/laptop to the Velop network.
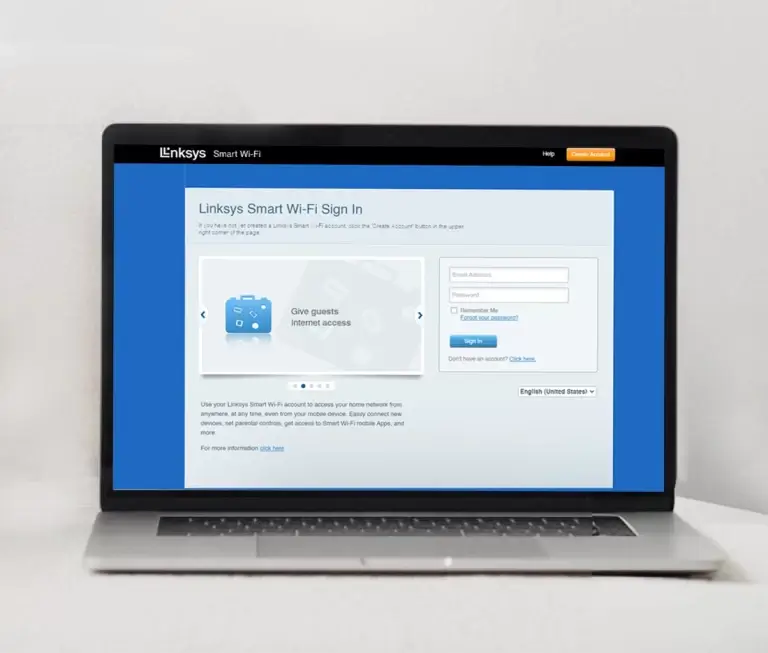
- Further, open the web browser and enter the “linksyssmartwifi.com” in the URL bar.
- Now, a login window appears to you, enter the login credentials.
- After login, visit the smart Setup wizard of your router.
- Hereon, navigate to CA>Connectivity>Router Setup>Setup Node>OK/Apply.
- Now, you will get a message saying “Your Master Node is now Configured”.
- Furthermore, you can change the network settings like SSID, password, bandwidth, etc. accordingly.
- If you wish to add additional nodes, then repeat this procedure by tapping Add Wireless Child Nodes’ or ‘Add Wired Child Nodes options.
- Hereon, follow the further instructions to complete this process.
- Lastly, click on the Save button to implement these changes.
Linksys app method to setup Linksys Velop system
- Initially, ensure that your Velop system is powered on with a purple light on it.
- Now, confirm that you have the updated version of the Linksys app.
- Then, check if your smartphone is connected to Velop’s network.
- Further, open the app and log in to your account using valid login credentials.
- If you don’t have an account, then create an account first.
- After login, visit the smart setup wizard of the router.
- Hereon, go to the bottom of the dashboard click on ‘Setup a New Product and select Velop.
- Now, go back to the router’s home dashboard and configure network settings like SSID, password, etc.
- Furthermore, you can also configure the Parental Control, Guest Network, Bridge Mode, etc. settings.
- Lastly, click on Apply/Save to implement these modified changes.

Facing issues in the Linksys Velop setup process? Try out these fixes!
However, with the key functionalities of the Velop routers, users often come across different issues and errors. Mostly, problems arise due to erratic connectivity, power supply issues, outdated firmware files, etc. while configuring their device. Therefore, to resolve these errors, below are some effective linksys velop setup troubleshooting tips:
- Check and ensure that you have a stable network connection.
- Confirm that all the devices are properly connected to the power supply.
- Always cross-verify the login credentials before accessing the Velop admin page.
- Ensure that you have entered the correct web GUI and IP addresses.
- Eliminate all the network interferences such as mirrors, furniture, etc. for better wifi signals.
- Inspect the ethernet cables and power adapters and replace them if found faulty.
- Reboot the Linksys Velop system, if facing any technical glitches or bugs.
- Resolve the browser issues by removing the cache, cookies, and browsing history.
- Timely check and update the router’s firmware with the latest version.
- Keep the Linksys app and browser updated to recent versions.
- Ensure that your parent node is closer to the child nodes.
- Make sure that you have configured and selected the 2.4GHz network bandwidth for your device.
- Resync your nodes if the connection is not being established.
- If facing frequent network connectivity issues, then contact your ISP authorities.
- When all other methods fail, reset your Linksys Velop router.
Performing the Linksys Velop setup as access point
If you want to perform the Linksys Velop setup as access point, then follow the below-mentioned steps:
- Initially, ensure that your computer is connected to the Velop’s network.
- Further, access the admin panel using the admin login credentials.
- After that, visit the smart setup wizard of the Velop system.
- Further, go to the Router Settings and navigate Connectivity>Internet Settings.
- Then, from the Connection Type, choose the AP Mode.
- Further, complete the AP mode setup by following the further instructions.
- Lastly, click on Apply to save these settings.
Exploring how to setup linksys velop bridge mode?
Primarily, the Linksys Velop bridge mode configuration is done to ensure seamless connectivity of all the devices through all the connected nodes. If you are curious to know how to setup linksys velop bridge mode, then follow the below-mentioned steps:
- Firstly, ensure that your parent node is powered on.
- Now, confirm that your computer is linked to Velop’s network.
- Further, open the web browser and type linksyssmartwifi.com” web or 192.168.1.1 IP addresses.
- Then, log in to your account by entering suitable details in the login window.
- After login, visit the master setup wizard of the Velop mesh wifi system.
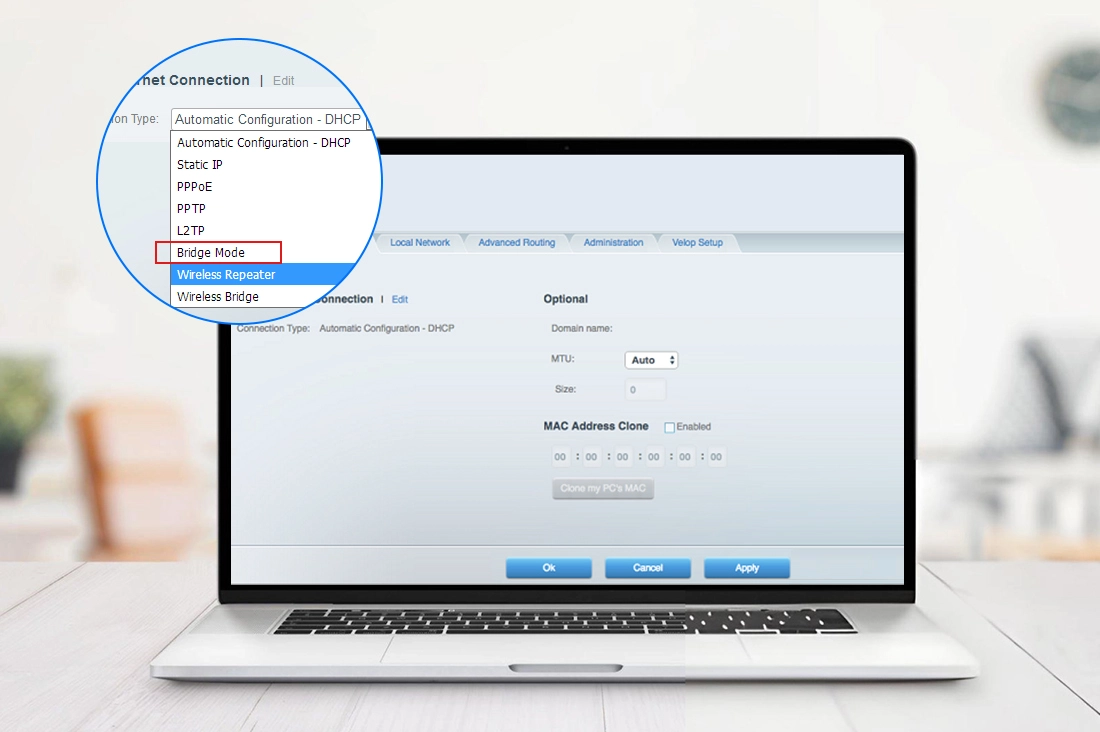
- Now, navigate the Router Settings>Connectivity>Internet Settings>Edit.
- Hereon, select the Bridge Mode in the Connection Type.
- Furthermore, do the IP configurations of your router or use the DHCP automatic IP generator feature.
- Afterward, click on Apply to save and execute these settings.
- Now, you see a warning screen, tap on Yes>OK.
- Ultimately, your Linksys Velop is now set as a bridge mode.
With this, you are now well aware of the linksys velop setup process with complete configuration information. If you want to know more about this networking device, then approach us!